Saturday, February 21, 2015

Sd.Kfz. 251/9 Ausf. D Frühe - Kanonenwagen aka Stummel

Sd.Kfz. 251/9 Ausf. D Frühe - Kanonenwagen aka Stummel

Had a partially assembled Tamiya Sd.Kfz. 251/9 ausf. D frühe from the 1990s lying around.  The remaining parts had long gone missing, and the kit seemed relegated to the never-to-be-finished pile.

Also, had an un-built Dragon Sd.Kfz. 251 ausf. D 3-1.  Was tempted to build it as the Sd.Kfz. 251/9 ausf. D späthe version.  However, also have the AFV Club Sd.Kfz. 251/9 ausf. D, which, from reviews, appears to be a more accurate version.  The plain Sd.Kfz. 251/1 version didn’t seem to be interesting and nor did the IR version, which apparently has some accuracy issues.

For something different, decided to try to kit-bash a Sd.Kfz. 251/9 ausf. D frühe based on the Dragon kit, but with parts as needed from the Tamiya kit, such as the floor gun mount and front gun shield. 

 Some initial research shows that the Tamiya kit lacks the gun shield supports, to that has to be added.   Additionally, the 75 mm main gun had cuts in the deflector shield not shown on the Tamiya or Dragon gun, so that change has to be made.  The driver’s seat was cut down low as well, so that is another necessary change.

Thought about changing the gun barrel to make use of the nice metal barrel provided by Dragon, but with the gun already assembled and the difference between the early and late mantles, may have to just go with the Tamiya gun barrel.

First step was to install the front gun shield into the Dragon hull.  At first glance, this seemed to be easy, but upon further examination, the fact that the Dragon upper hull apparently is 2-3 mm too narrow, the Tamiya gun shield is too wide.  (There is a visually notice difference in shapes between the Dragon and Tamiya upper hulls.)  Also, the angle of the front plate is slightly different between the two models.  Long and short, ended up having to trim the width of the gun shield and replace the front plate.  For the driver’s side, the Dragon front plate was cannibalized, but the cut out for the visor meant that on the other side the front plate had to be assembled from plastic card.  The welds from the Dragon visor were cut off and attached to the top and side.  It ended up being a lot more work than expected.  The picture below shows the result – gray is Dragon, tan is Tamiya and white is plastic card.  The upper hull is sitting on the old Tamiya chassis for now. 


Below - the heavily shortened driver figure next to the original, as well as the torso of the driver figures from the Dragon Sd.Kfz. 251 3 in 1 kit and the Cyber Hobby Sd.Kfz. 253 kit.


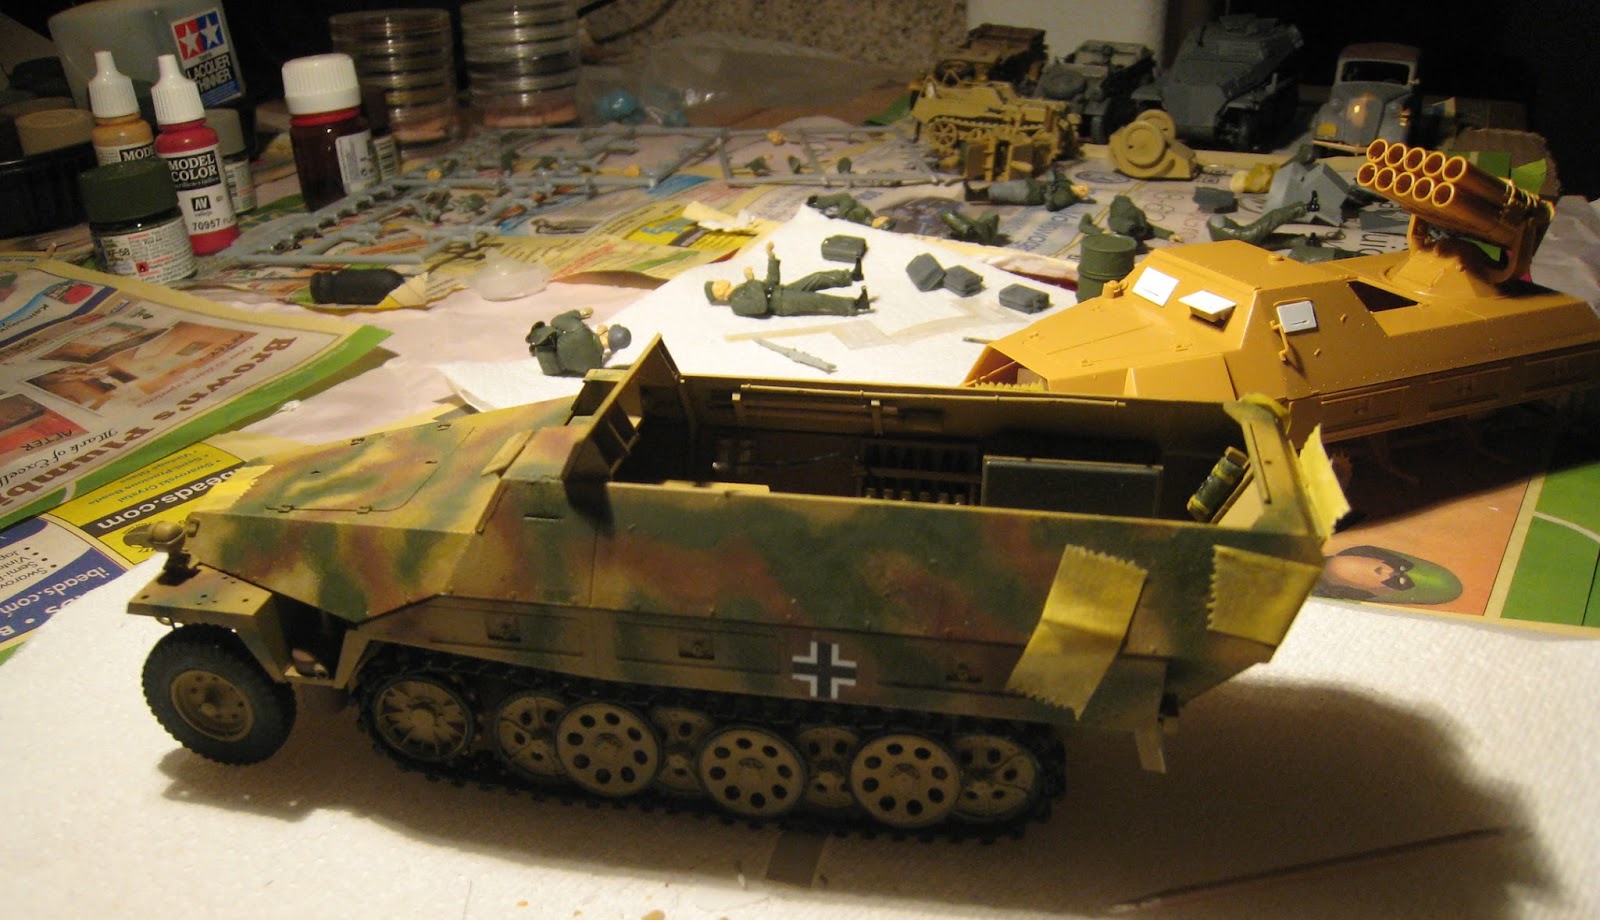


Balkenkruz and loading stencil are from Archer Fine Transfers.  Rear license plates are from the Tamiya SdKfz 251/9 kit - will use "534" and 2. Panzerdivision marking from Tamiya as well.  Need to add antenna and weather.


Wednesday, February 04, 2015

Zis-5


Woof!

I was warned.  I had read a number of reviews of the Alan Zis-5 truck in its prior incarnation as a Dragon/Alan rebox noting that the kit has issues.  But lured by the rock bottom price, I decided to try it in its Ark Models incarnation, figuring that it would be a relatively short build and I could abandon it without too much pain if it was too much of a dog.

I decided to start with the cargo bed, because the reviews indicated that the cargo bed had minimal problems.  Indeed, while there were some minor fit issues between side supports and the base of the cargo bed, the cargo bed went together fairly well.  Based on some reference pictures, it looks like the underside of the cargo bed, as well as interior faces of supports were left as plain, unpainted wood.

The undercarriage was next.  Although fairly complex, the engineering actually seemed fairly decent.  However, then putting together the front wheel assembly, it looks like the molds were placed in the wrong way because half of one piece was molded correctly, but the other half not – consistent with one of the molds being reversed.  So had to make do with some substitutes.  We’ll have to see how it looks because much of the undercarriage is visible.

The wheels are rightly indicated by reviewers to be among the worst parts.  After some hesitation, I purchased the Hussar Production replacement Zis-5 and Zis-6 wheels – even though the cost was more than the kit itself.  The wheels are nicely done in resin, although the interior hub for the front wheels look like they may have been damaged when removed from their casting connection.

Painting references suggest that the undercarriage frame and maybe headlights were in black.  Olive green (Tamiya) was used for the cab and cargo bed.

Tentatively decided to go with captured truck, using dunkelgelb as camouflage overspray.  Maybe add headlight covers, notek light, license plates and pioneer tools per an amalgamation of various references.  Wiring for the headlights and, presumably, notek light, goes through the fenders.  Because the fenders and undercarriage are so open, may need to have wiring to the engine itself.


Note underside of bed and supports left in natural wood color (or hopefully at least a moderately reasonable facsimile thereof - Tamiya wooden deck tan).  The headlights are wired but not yet connected.

Cab not glued but just fitted in place (hence gaps).  Sunshade at top of windshield also not yet fitted.  Some random cargo added for visual interest.

Wednesday, November 26, 2014

Bronco Seehund U-Boat Type XXVIIB

Neat kit of Kriegsmarine midget submarine Type XXVIIB.  Simple to assemble, but detailed.  An oversized box that resulted in some parts breaking loose from the sprues and some slight damage at the break points.
 
Generally very nice kit.  Two problems – one in design, one in execution.

Design problem – the photo-etch front propellers for the torpedoes are extremely finicky – maybe best solution is to score fixing points. 

Execution problem – in my version, at least, it looks like part of the mold for the top of one of the hull halves was not filled in completely so parts are missing – at first thought it wouldn’t be a big deal because would be covered by conning tower, but the missing areas can be seen from the top view so these had to be roughly recreated with plastic card.  Not hard to fix, but kind of a weird thing for what should be a first-rate kit – only comparable have experienced was where ark models (former Alan) zis-5 had one sprue half molded in the wrong direction (!)  dirt cheap price of ark models made that lack of quality control a little easier to understand even if the result was worse.
 
What color to paint Seehund and torpedoes?  (G7e torpedoes?)
 
Per Dougie Martindale’s article on Kriegsmarine U-Boat Colours and Markings, the Kriegsmarine used a dark grey anti-fouling paint below the waterline known as schiffsbodenfarbe III grau.  This suggests that the two medium or light grey colour schemes in the Bronco instructions are apocrycphal.  In fact, upon seeing the apparent reference for the first scheme (#17), it looks like the submarine was completely repainted from the original.  No reason to know whether the owners thereof were or were not historically accurate, but it seems odd that schiffsbodenfarbe III grau would not be used – particularly as Martindale also notes greater predominance of darker greys in the later years of the war.


Therefore, schiffsbodenfarbe III grau will be the primary colour, for which I will use Tamiya Dark Sea Gray (XF-54) – mainly because I have some, but also because it seems to match the Martindale’s colour same of schiffsbodenfarbe III grau the best (although monitor colors, etc. make matching somewhat imprecise).
 
There may be some basis for a lighter color on the “coning tower” but for now it will be left schiffsbodenfarbe III grau.  According to the Martindate, the lighter grey was more for aesthetics, but there do appear to be some reference photos showing a lighter conning tower, and that would consistent with bigger boats.
 
Torpedo color seems to be a mystery.  Bronco’s first scheme (#17) shows a red warhead with a blue body.  The source Seehund has these in fairly bright shades, which seems unrealistic.  While the historical accuracy seems questionable, for aesthetic reasons, I went with the red warhead, blue body and steel tail, for which Tamiya Hull Red, Field Blue and Gun Metal were used.  Hull Red and Field Grey are somewhat more subdued and therefore perhaps a little more plausible that the bright red blue of the source.


Sunday, May 25, 2014

Trumpeter Komintern WIP

And now for something different  . . . the Trumpeter Komintern.  Quality seems much improved over the Trumpeter Marder I (H39), although the cab interior apparently is wrong.


Test fit of the cab, doors, hood.  Touch-up painting required.  Overall color used is Tamiya Olive Green.  Perhaps a more yellow hue would be appropriate.  The kit went together fairly readily with generally good fit, although getting the proper alignment on some of road wheels can be a little tricky because the attachment points could have been more robust.  Overall, however, it was a nice straight-forward build with good detail but not an excessive number of parts.  Without readily available references, not sure about accuracy issues other than the cab interior.  The bench layout in the  cargo bed might be suspect as well, but I can't tell - maybe ignorance makes for an easier build because you don't have to worry about correcting minute details.  Need to figure out driver and something to tow . . .
 

Tuesday, April 29, 2014

ICM 7.62 Pak 36(r)


Overall this kit was pretty straight-forward to assemble, although some locating holes need more depth and some of the detail may be a little soft compared to the Bronco kit (from pix of the same).  The instructions aren't the clearest, esp. as to what is required for travel mode.  The biggest issue I found is that the gun doesn't elevate sufficiently for the rear of it to fit within the cross bar for travel mode.  Probably some improper assembly on my part.

Wednesday, February 26, 2014

T-34/76 WIP

Starting beute T-34/76 based on the DML T-34 German Army. Generally OOB but with a few minor modifications as follows:  added wiring for front notek and rear convoy light, swapped out front headlights for smaller German headlights, replaced antenna mast and base with German antenna mast and base (spare from StuG III F/8, although a bit thick), added S-hooks and fire extinguisher per Tankograd reference pix (a treasure trove of references), added jack block (no reference, but gotta be somewhere, right?), added engine louvers (or at least enough to hopefully look like louvers through the mesh screen), added two jerry cans to rack.  Balkenkruz from Archer Fine Transfers. Crew is modified miniart german tank crew figure with replacement head and leg, and Archer Fine Transfer decals.  Initially added full legs but tightness of turret meant that lower legs had to be removed to fit.  Can see why larger turret was needed.  Feldgrau/black uniform color combo based on Tankograd ref.  The kit generally went together pretty well.  The engine deck screen was a little fiddly, esp. when one of the cross straps was eternally lost via a tweezer fling.  The tracks also turned out to be more difficult than anticipated.  Given their width, thought they would hold together well, but turned out to be a bit fragile.  Also, because fenders are molded onto to hull getting them to sit nicely was more work than expected - in part because of the tall track teeth.  The idler is not glued in and should be rotated higher than it is in the pictures. 


Sunday, December 01, 2013

Stug III x 2 WIP

DML StuG III F/8 and StuG III Ausf. G (early) (Bodo Spranz) WIP.  The winterketten for the F/8 are being switched out with the regular tracks found in the Cyber Hobby Orange Box StuG III F.  The camo and markings for the StuG IIIG are roughly based on a picture found in Peko Publishing's Sturmgeschutz III on the battlefield showing several StuG IIIGs from an unidentified unit with "field" applied camo and small 3 digit tac numbers.  The balkenkruz are Archer Fine Transfers; the tac # is from the Kagero Jagdpanzer book (1/48th scale).  Because both are visible from the open loader's hatch, an MP40 was added to the back of the firewall near the loader's hatch, as well as the stored MG34 in the rear corner.  Putting together the various subassemblies of the StuG IIIG required some careful planning and even then I screwed up completion of the gun assembly; fortunately, the fit is pretty good once everything is in place.

Because of the stowage rack on the rear of the StuG IIIG, installing some of the tools on the sides of the engine deck took extra work.  In particular, the wire cutters don't fit and so some adjustments were needed.  The jack was a very tight fit, but just squeezed in on the fender.  Brass radio aerials were installed and the undersized metal tow cables replaced with picture hanging wire closer in size to the plastic tow cable heads.  Fitting the tow cables is questionable, however, because of the fender support's proximity to the one of the cable latches.